
Ce billet n’a pas encore été traduit en français. La version anglaise est disponible ci-dessous.
In case you missed it, the Helping with PiRogue Tool Suite blog post presented what Pirogue Tool Suite is and why Debamax decided to start supporting this project.
This blog post covers further work that happened in 2024:
- keeping up with upstream projects, including the switch to Debian 12 (Bookworm);
- making the PiRogue Tool Suite independent from Raspberry Pi hardware.
Switching to Debian 12 (Bookworm)
Initially, the project was publishing PiRogue images built using the same tool as the Raspbian/Raspberry OS project, maintaining a PiRogue-specific branch dealing with the few tweaks required for PiRogue (like setting up the custom repository).
In 2023, the approach was changed to work on Raspbian-published images instead, downloading them and modifying them with a few scripts to produce PiRogue images. At the time, the input image was the “Raspberry Pi OS Lite” one, for the arm64 architecture.
In 2024, with the upcoming ViRogue project in mind (detailed in the second part of this blog post), the feasibility of moving from Raspberry OS to Debian as the base distribution for PiRogue was discussed. At the time, target hardware was limited to Raspberry Pi 3 and Raspberry Pi 4. Since those had been fully supported by the mainline Linux kernel (found in Debian and other distributions) for a number of releases, switching away from the specialized Raspberry OS distribution didn’t seem worrisome. The PiRogue-specific HAT could have been a little bit of a challenge, but thankfully Debamax is quite familiar with hardware integration on Raspberry Pi devices, including DTS/DTB-related fun.
All Debian packages were reviewed with two goals in mind:
- spotting anything that would be specific to Raspberry OS, and adjusting it to work with Debian instead;
- making sure those packages would work with Debian 12, as the Raspberry OS in use at the time was itself based on Debian 11.
This meant having to work on several fronts in parallel:
- new
debian-12branches in all active Git repositories; - brand new
debian-12Debian repository, separate from the historical PPA, to make sure existing systems wouldn’t pull work-in-progress packages; - brand new
pirogue-imagesrepository which would be used to build Debian-based PiRogue images.
Initially, the tooling shipped in the pirogue-images repository was used to prepare official PiRogue images supporting Raspberry Pi 3 and Raspberry Pi 4 as usual, but that was extended to build experimental PiRogue images supporting Raspberry Pi 5 (see TODO.md and pirogue-images#2 for more information).
Another important topic was Frida, which is used to instrument and inspect target devices, including mobile phones. Since they are fast-moving targets, we cannot stay with a given Frida version forever, and it’s important to keep up. Unfortunately, breaking changes are not uncommon, so we have to pick and choose carefully, instead of following any kind of “latest and greatest” approach.
Debamax decided to invest some time developing a companion deb-frido repository, alongside the existing deb-frida repository. The idea is to automate detecting new upstream releases, merging, patching, building, and checking generated packages. If anything breaks, a developer must fix the situation manually. If nothing breaks, the generated packages are published into a staging repository, from where PiRogue developers can download packages, experiment with them, before merging them into the actual debian-12 repository (at which point they become visible to actual PiRogue users).
Automation matters because there are a lot of new upstream releases each year:
- in 2022: 26 releases;
- in 2023: 22 releases;
- in 2024: 29 releases (so far).
Most of the design and implementation happened during regular streams on the @CyrilBrulebois Twitch channel.
ViRogue project
Transparency matters: this project was outsourced to Debamax by Defensive Lab Agency. Thanks for trusting us!
Less hardware, more flexibility
The idea was to get rid of the “hardware must be a Raspberry Pi” requirement when it comes to setting up a PiRogue. Said slightly differently, it was about “virtualizing the Raspberry Pi”, which led to the internal “ViRogue” codename for this project (as seen in various branches and repositories at the time).
Initially, the network setup would look like this:
- the Raspberry Pi is connected to the internet via its Ethernet connection, and PiRogue interfaces (e.g. the web-based dashboard) are made available through this connection;
- the Raspberry Pi shares its connectivity through its Wi-Fi connection, configured as an Access Point (AP), and devices to be investigated use this connection.
As one might imagine, running on a Raspberry Pi is quite orthogonal to that network setup, and virtually anything could replace the Raspberry Pi. Some low-cost PC would easily do the trick, and supporting such systems is usually trivial (no need to wonder about hardware integration at the Linux kernel, DTB, or bootloader levels). The important part was about making sure to publish the few architecture-specific PiRogue packages for both arm64 (the historical architecture, for Raspberry Pi devices) and amd64 (the PC architecture, 64-bit as well). Most packages are Python-based and available for the all pseudo-architecture, but packages for NFStream and Frida have to be built for each architecture.
Going one step further, even the “physical machine” requirement can be lifted, and a virtual machine (VM) would work fine as well. What matters is really about having one connection for use by the devices getting investigated (the isolated network), and another one for internet and investigator access (the external network).
At this point, the isolated network was already no longer tied to a Wi-Fi interface on a Raspberry Pi configured in AP mode, but could be a physical or virtual Ethernet interface (physical or virtual machine).
But we wanted to go even further, making it possible for the isolated network to be provided over a VPN, so that PiRogue could be deployed on some internet-accessible system (e.g. a virtual private server or VPS). It was decided to focus on WireGuard.
Design and implementation
Since all devices supported initially (Raspberry Pi 3 and Pi 4) looked similar, a few things had been hardcoded in various components, like the eth0 and wlan0 interfaces. With the updated design, it became critical to have the proper interface names (for the isolated one as well as for the external one) configured in the right components, but we also needed to introduce the concept of “operating mode”:
- Originally, we only had the “access point” mode (1 wireless, 1 wired).
- Moving to supporting two arbitrary interfaces meant introducing the “appliance” mode, where we wouldn’t fiddle with a wireless interface and its configuration as an access point (through
hostapd). In this mode, it’s very likely that both interfaces are considered to be wired ones. - Adding a “VPN” mode alongside the “appliance” one was the logical next step. Both modes are very similar, except we have a few more things to take care of in the VPN case, like managing peers (WireGuard doesn’t distinguish between client and server roles as other VPN technologies like OpenVPN would).
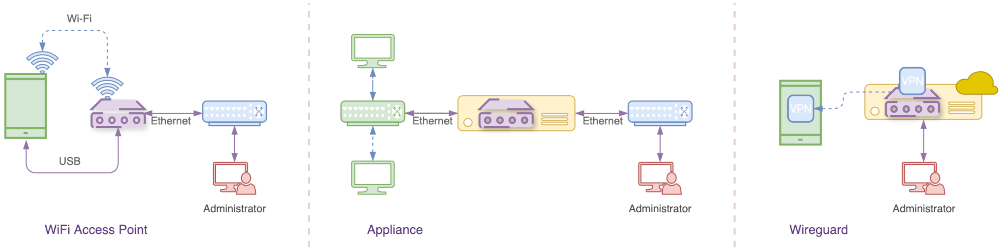
Further information can be found in the PiRogue installation instructions.
Given the requirements, Debamax suggested an approach that proved to be quite robust for other customers: having a single component be responsible for dealing with everything configuration-related, deploying the relevant configuration files across all other components, enabling/disabling/restarting services as required. That’s why the pirogue-admin component was introduced, and also integrated in the pirogue-base post-installation script. This made it possible for pirogue-admin to automatically choose and deploy a “best guess” configuration depending on the detected configuration, based on whether the system is running on a Raspberry Pi, and on the number and type of available interfaces.
Documentation was written accordingly, and further information can be found on the website:
- Configuration: This page is mainly intended for PiRogue administrators.
- System integration: This page is mainly intended for PiRogue developers.
Conclusion: Tying everything together
Let’s quote the documented requirements for installing PiRogue of on an arbitrary machine:
The PiRogue ecosystem has been extended to cover more use cases, and it’s now possible to deploy it on a machine featuring two interfaces. The requirements are the following:
- a Debian 12 installation on a physical or virtual machine;
- using the amd64 or arm64 architecture;
- with at least 4GB of RAM and 40GB of disk;
- an initial network configuration allowing internet access.
This could look like a natural conclusion to this 2-part blog post, combining the switch to Debian with the brand new flexibility regarding hardware and network configuration. However, the devil is in the details, as there’s no single definition for “a Debian 12 installation”!
Since we wanted to support as many configurations as possible, many tests were run, including:
- PiRogue images deployed on Raspberry Pi 3, Pi 4, and Pi 5 (obviously);
- PiRogue deployed on top of Debian-provided cloud-oriented images, running in virtual machines;
- PiRogue deployed on top of Debian systems deployed with Debian Installer netinst images.
Since users might want to install a desktop environment, we experimented with all the desktop environment options offered by the Debian Installer: each one declares a dependency on a given package that manages the network configuration (e.g. ifupdown or network-manager), and pirogue-admin needed to know about the various options. Tests even included chaining two laptops together, mixing up connectivity between wired and wireless interfaces to test as many combinations as possible.
Of course, those system integration tests were documented extensively as well.